 Wird bearbeitet...
How To List An Item
So listen Sie einen Artikel auf
Dieser Text wurde maschinell übersetzt.
Original zeigen?
Wird bearbeitet...
How To List An Item
So listen Sie einen Artikel auf
Dieser Text wurde maschinell übersetzt.
Original zeigen?
Wird bearbeitet...
How To List An Item
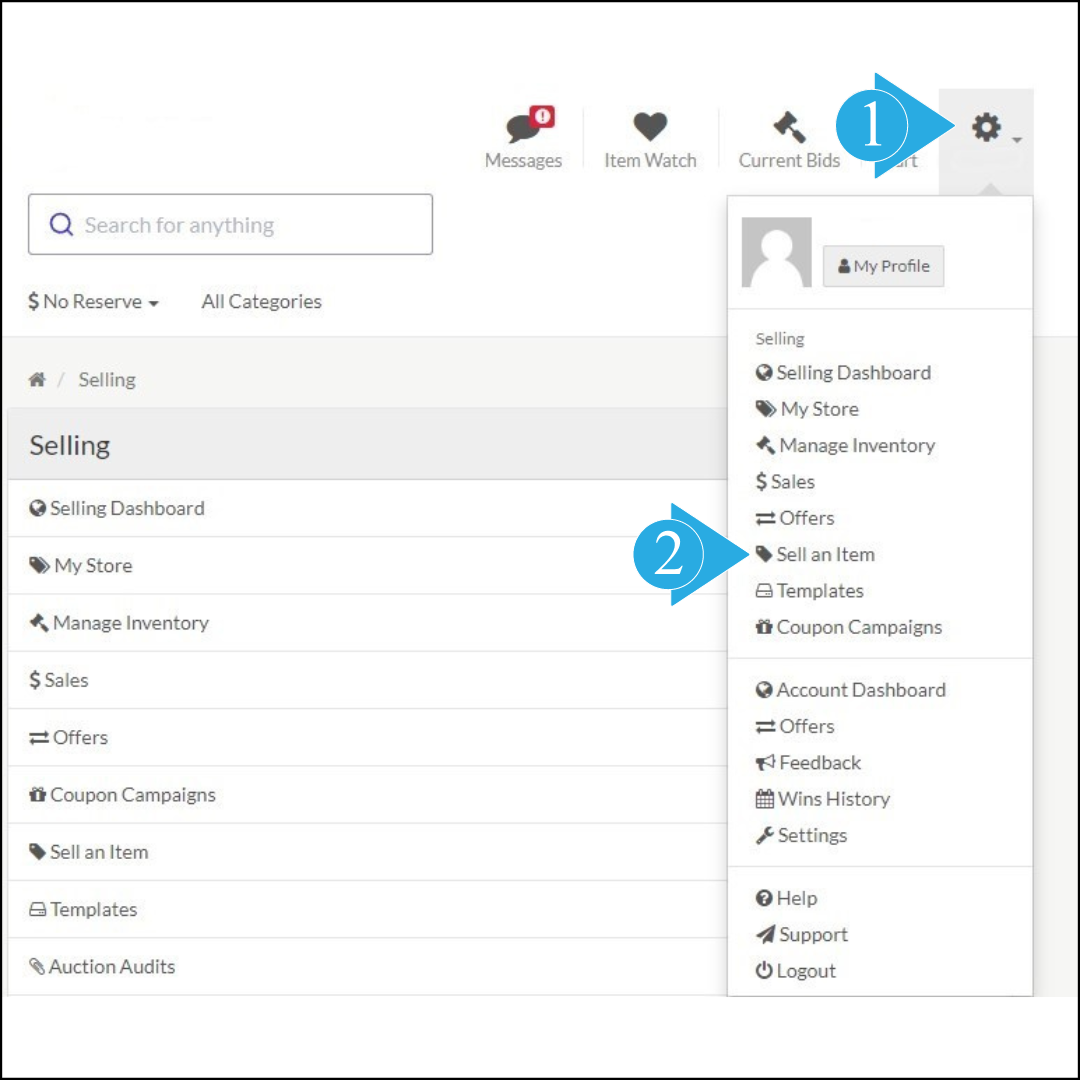
Once you set up your store, you’re ready to start selling your items in our marketplace. To sell an item, head to your Seller Dashboard and click the Sell An Item button. Fill out the product features in as much detail as you can, to give the most accurate description of the item being sold.
We encourage you to read our Listing An Item - What You Need To know help article, to understand what information must be included in your listing.
1. Product Details
You are now ready to create your listing. Here's a breakdown of what your product details must include:
Template Name - choose the name of the template. For example, if you are selling a skin care product, you may want to call it “Face Scrubs”.
Category - when selecting a category, choosing the deepest level is the easiest way to help your customers to find your item on our marketplace. For example, if you are selling skin care products, you may want to choose the Beauty category.
Title - Enter a descriptive title. For example, “150ml Glowing Skin Vanilla Scrub”.
SKU - Enter the stock keeping unit for the product. For example, VS1.
Description - here is where you give as much detail as possible about your product. Given the example above, you may want to include information such as where the product components are sourced from, what ingredients are used, instructions on how to use the product and who will benefit from it the most (all skin types, etc).
Dimensions - include details if applicable.
Weight - include details if applicable.

Quick tip...
Templates are a great way to save time when you have to list more than one item that falls in the same category, as most of the information is already filled in. We encourage you to read our How To Create A Template help article to learn how to use templates.
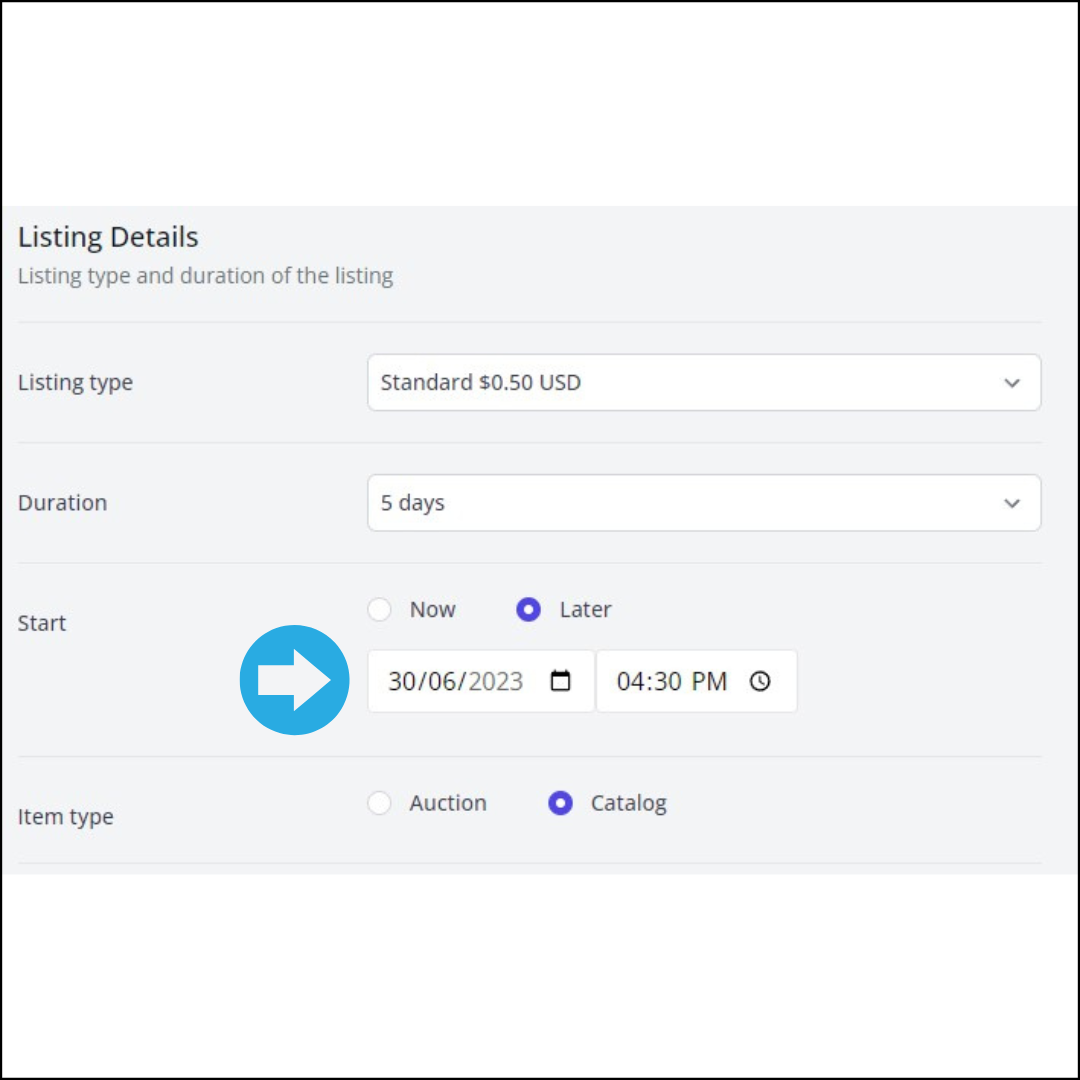
2. Listing Details
Listing type - depending on your seller plan, select a listing type (standard, premium, boost, showcase). We encourage you to read our Listing Types help article to fully understand what your listing includes.
Listing duration - For auctions only, you can set the duration of the auction.
Listing start date and time - you can either choose to start your listing as soon as it’s published or you can schedule your listing to start later. We encourage you to read our Listing An Item - What You Need To Know help article to understand how to manage your scheduled listings.
Item type - your item can be an auction or a catalogue item.
Please note: if you're listing an Auction Item, once the auction finishes and there is no bid placed on it, the item will relist as a Catalogue item.
The price used for the Catalogue Item will depend on the auction type:
Auction With No Reserve Set - the catalogue price will be the starting bid ($1).
Auction With Reserve Set - the catalogue price will be the reserve price.
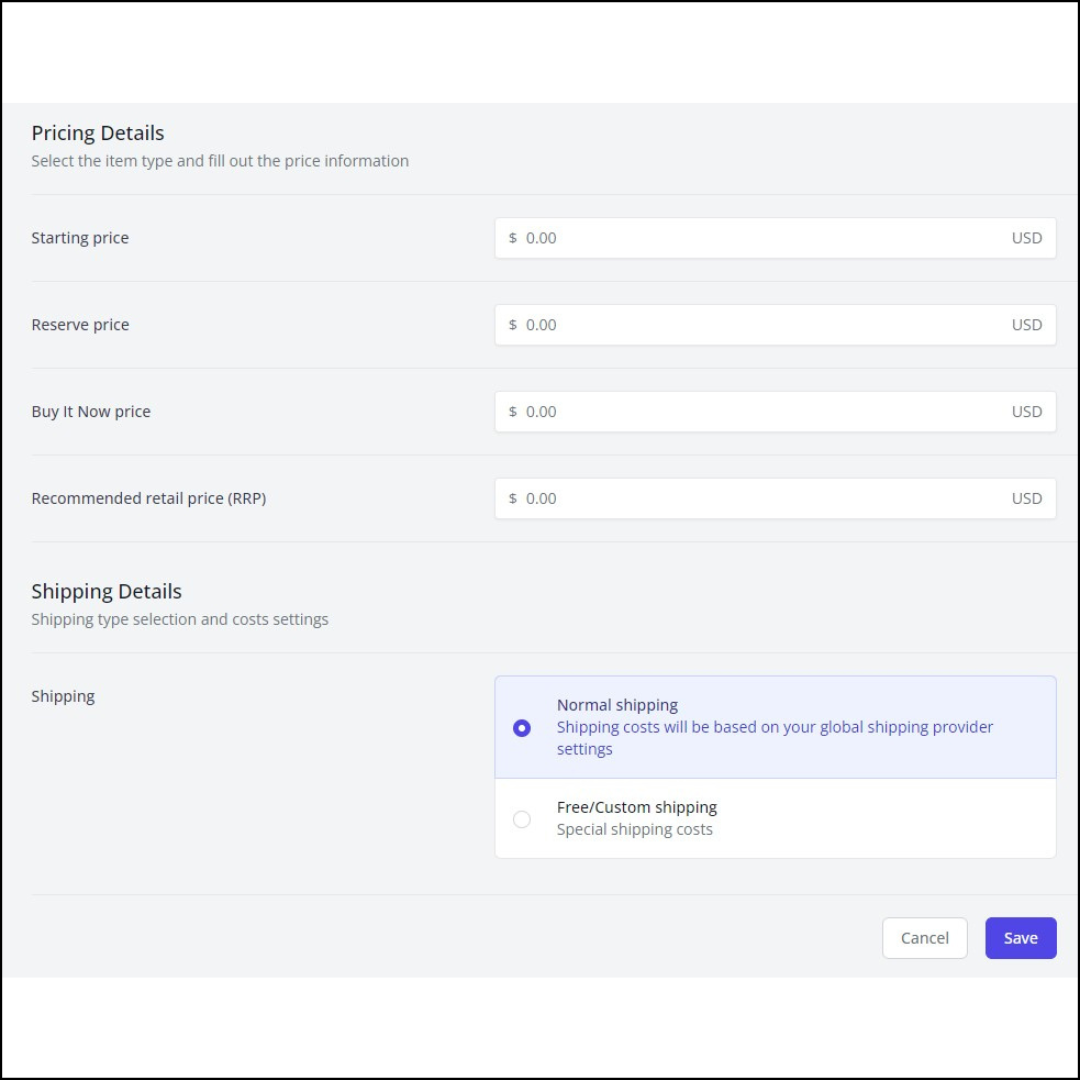
3. Pricing and Shipping Details
Set your pricing and shipping preferences for your listing.
Price - provide all price details. Starting price and reserve price are for auction listings only.
Normal Shipping - the listing will use your global settings.
Free/Custom Shipping - the listing will use whatever shipping value you place in the listing.
WARNING: This shipping value will override all shipping provider values.
4. Photos & Videos
The next step is to add photos and videos. All listings must have at least two photos from different angles or one photo and one video of the item.
Please note: the main picture must be square and at least 1200x1200px.
5. Publish Your Item
It's time to publish your item! Click on the green Publish Now button and your item will successfully be listed. Want to view your listed items? Simply go to My Store and see all the items you’ve listed so far.
So listen Sie einen Artikel auf
Sobald Sie Ihren Shop eingerichtet haben, können Sie mit dem Verkauf Ihrer Artikel auf unserem Marktplatz beginnen. Um einen Artikel zu verkaufen, gehen Sie zu Ihrem Verkäufer-Dashboard und klicken Sie auf die Schaltfläche „Artikel verkaufen“ . Geben Sie die Produktmerkmale so detailliert wie möglich an, um eine möglichst genaue Beschreibung des verkauften Artikels zu erhalten.
Wir empfehlen Ihnen, unseren Hilfeartikel „Einen Artikel auflisten – Was Sie wissen müssen“ zu lesen, um zu verstehen, welche Informationen in Ihrem Eintrag enthalten sein müssen.
1. Produktdetails
Sie können jetzt Ihren Eintrag erstellen. Hier ist eine Aufschlüsselung dessen, was Ihre Produktdetails enthalten müssen:
Vorlagenname – Wählen Sie den Namen der Vorlage. Wenn Sie beispielsweise ein Hautpflegeprodukt verkaufen, möchten Sie es möglicherweise „Gesichtspeeling“ nennen.
Kategorie – Wenn Sie eine Kategorie auswählen, ist die Auswahl der tiefsten Ebene die einfachste Möglichkeit, Ihren Kunden dabei zu helfen, Ihren Artikel auf unserem Marktplatz zu finden. Wenn Sie beispielsweise Hautpflegeprodukte verkaufen, möchten Sie möglicherweise die Kategorie „Beauty“ auswählen.
Titel – Geben Sie einen beschreibenden Titel ein. Zum Beispiel „150 ml Glowing Skin Vanilla Scrub“.
SKU – Geben Sie die Lagereinheit für das Produkt ein. Zum Beispiel VS1.
Beschreibung – hier geben Sie so viele Details wie möglich über Ihr Produkt an. Angesichts des obigen Beispiels möchten Sie möglicherweise Informationen angeben, z. B. woher die Produktbestandteile stammen, welche Inhaltsstoffe verwendet werden, Anweisungen zur Verwendung des Produkts und wer am meisten davon profitieren wird (alle Hauttypen usw.).
Abmessungen – geben Sie ggf. Einzelheiten an.
Gewicht – geben Sie ggf. Einzelheiten an.
Kurzer Tipp...
Vorlagen sind eine großartige Möglichkeit, Zeit zu sparen, wenn Sie mehr als einen Artikel auflisten müssen, der in dieselbe Kategorie fällt, da die meisten Informationen bereits ausgefüllt sind. Wir empfehlen Ihnen, unsere Anleitung zum Erstellen einer Vorlage zu lesen Hilfeartikel, um zu erfahren, wie man Vorlagen verwendet.
2. Auflistungsdetails
Listing-Typ – Wählen Sie abhängig von Ihrem Verkäuferplan einen Listing-Typ (Standard, Premium, Boost, Showcase). Wir empfehlen Ihnen, unseren Hilfeartikel zu Eintragstypen zu lesen, um vollständig zu verstehen, was Ihr Eintrag enthält.
Angebotsdauer – Nur für Auktionen können Sie die Dauer der Auktion festlegen.
Startdatum und -uhrzeit des Eintrags – Sie können Ihren Eintrag entweder sofort nach der Veröffentlichung starten oder ihn so planen, dass er später beginnt. Wir empfehlen Ihnen, unseren Hilfeartikel „Einen Artikel auflisten – Was Sie wissen müssen“ zu lesen, um zu verstehen, wie Sie Ihre geplanten Angebote verwalten.
Artikeltyp – Ihr Artikel kann ein Auktions- oder Katalogartikel sein.
Bitte beachten Sie: Wenn Sie einen Auktionsartikel einstellen, wird der Artikel erneut als Katalogartikel eingestellt, sobald die Auktion beendet ist und kein Gebot dafür abgegeben wurde.
Der für den Katalogartikel verwendete Preis hängt von der Auktionsart ab:
Auktion ohne Mindestpreis – der Katalogpreis ist das Startgebot (1 $).
Auktion mit Reservesatz – der Katalogpreis ist der Reservepreis.
3. Preis- und Versanddetails
Legen Sie Ihre Preis- und Versandpräferenzen für Ihren Eintrag fest.
Preis – Geben Sie alle Preisdetails an. Startpreis und Mindestpreis gelten nur für Auktionsangebote.
Normaler Versand – für das Angebot werden Ihre globalen Einstellungen verwendet.
Kostenloser/individueller Versand – für das Angebot wird der Versandwert verwendet, den Sie im Angebot angegeben haben.
ACHTUNG: Dieser Versandwert überschreibt alle Werte des Versandanbieters.
4. Fotos und Videos
Der nächste Schritt besteht darin, Fotos und Videos hinzuzufügen. Alle Angebote müssen mindestens zwei Fotos aus verschiedenen Blickwinkeln oder ein Foto und ein Video des Artikels enthalten.
Bitte beachten Sie: Das Hauptbild muss quadratisch sein und mindestens 1200 x 1200 Pixel groß sein.
5. Veröffentlichen Sie Ihren Artikel
Es ist Zeit, Ihren Artikel zu veröffentlichen! Klicken Sie auf die grüne Schaltfläche „Jetzt veröffentlichen“ und Ihr Artikel wird erfolgreich aufgelistet. Möchten Sie Ihre gelisteten Artikel ansehen? Gehen Sie einfach zu „Mein Shop“ und sehen Sie sich alle Artikel an, die Sie bisher aufgelistet haben.
War dieser Artikel hilfreich?